Counter Strike 1.6 dedicated server installation on Windows XP tutorial -=D(2)N=-
In order to install a Counter Strike 1. 6 dedicated server, you need :
a.Windows XP, processor 1000 ghz, memory 256 ram
b. Connexion to internet
c. 300 - 400 MB free space on disk
You shall have to follow a few steps :
1. Connect to the internet
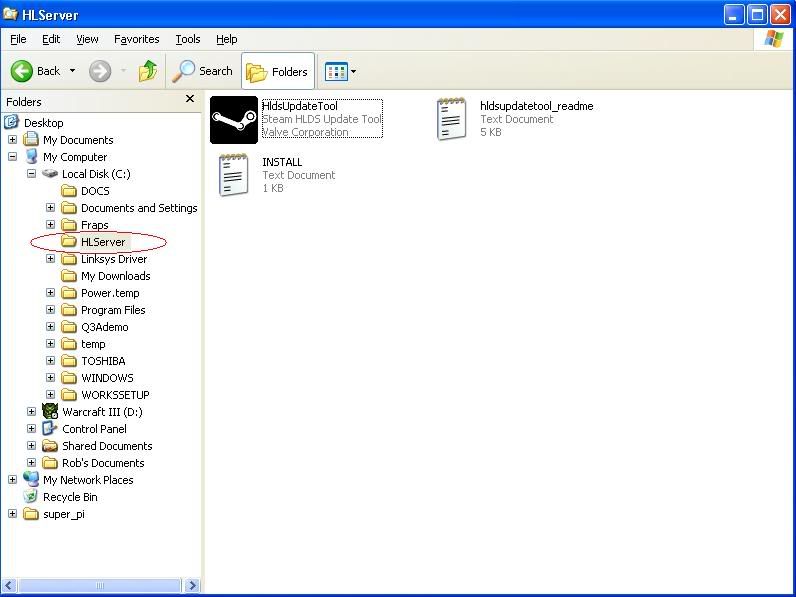
3. Create an new directory on your disk and name it HLDS . It can be named anyhow but we shall use HLDS because it`s classic .
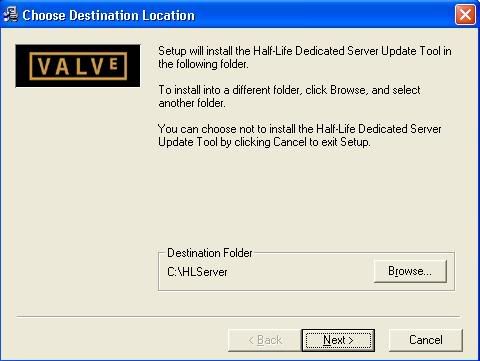
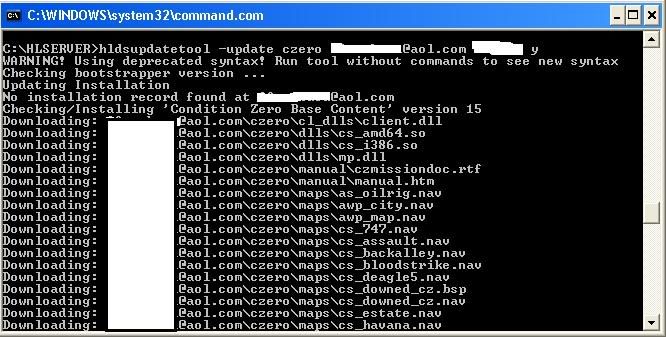
4. Now doubleclick on installer.exe and when the selection window appeares you select the new directory HLDS . Hit OK and wait a few moments . A blue window will appear on screen displaying the scroll of the installation . At this point the installer downloads and installs all the server`s components in your HLDS directory. It can take some time to do it, depending on the internet connection , so have a little pacience .When the installer finishes his work , check out the HLDS directory and see if it has approximativly 315 MB .If it has , then everything it`s ok and if it hasn`t 315 MB you`ll have to repeat this step . Open the HLDS directory ; it should look like this

Now open the cstrike folder , that should look like this

5. Next step is to set the server up for accepting non steam clients . In order to do that download you can use one ofe these methods:
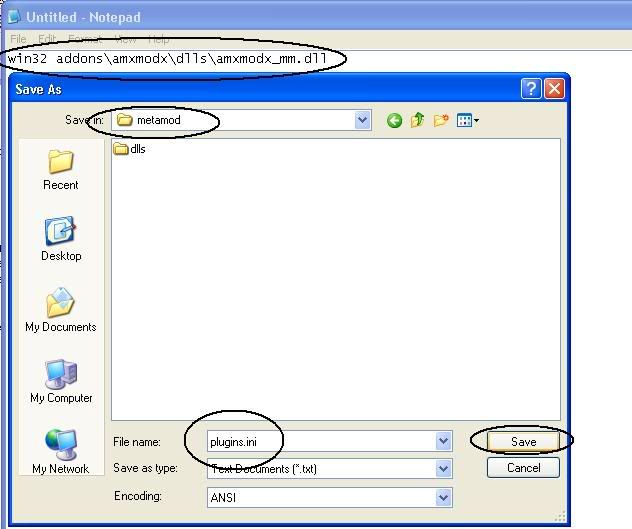
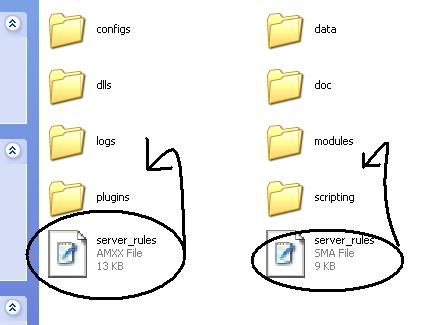
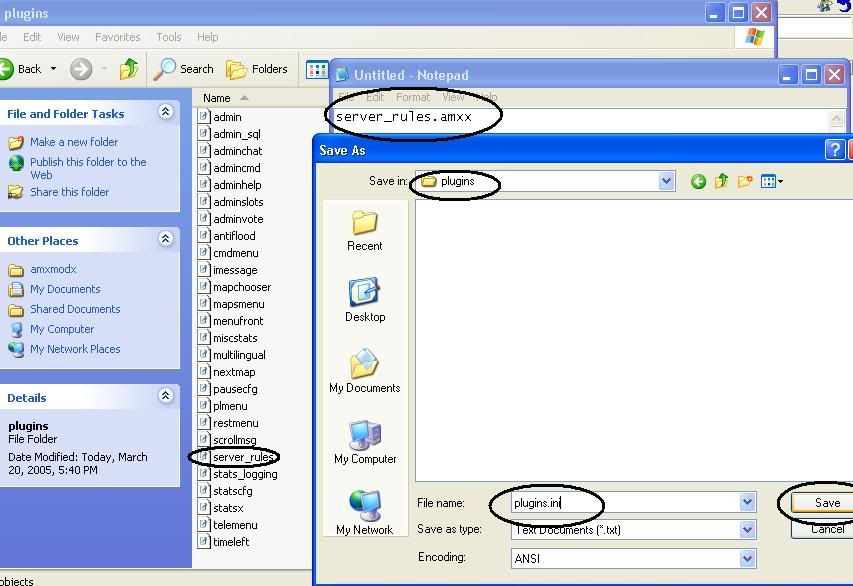
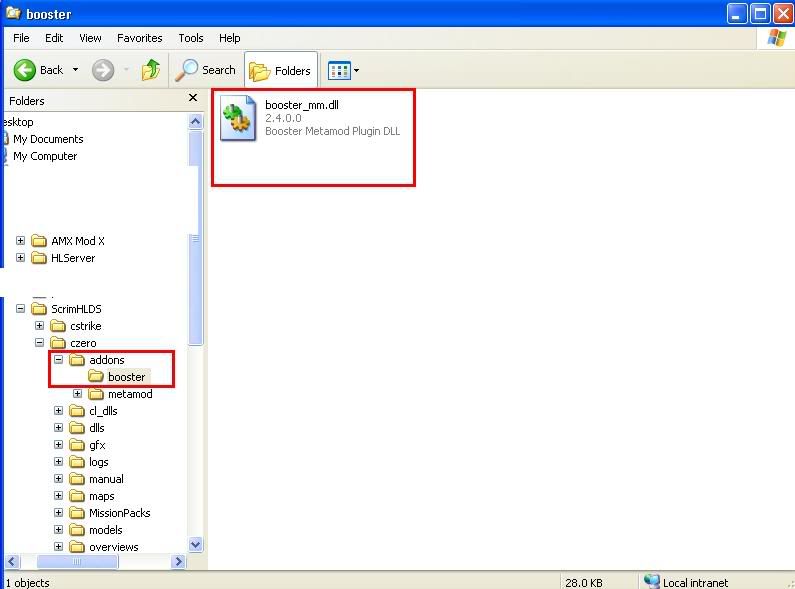
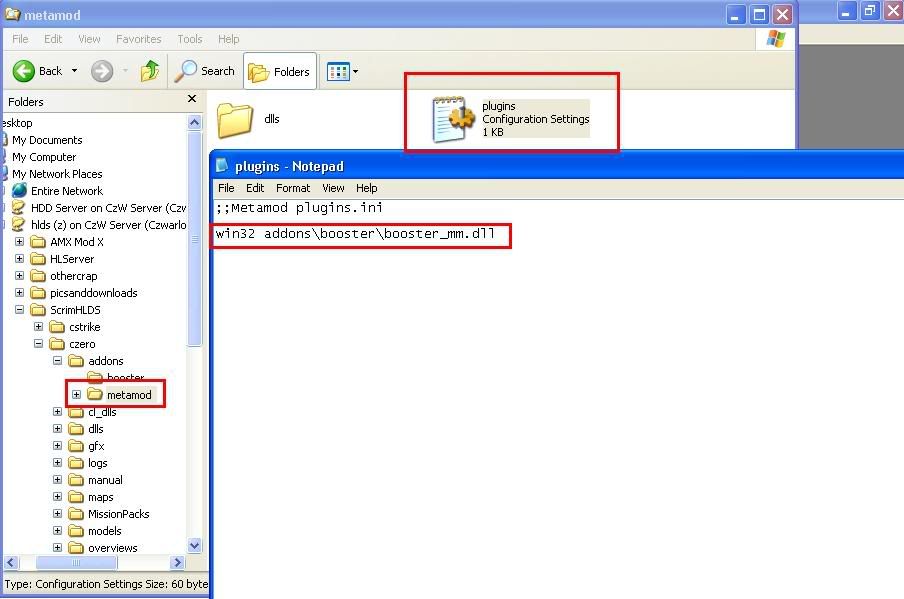
- 5.1 Rcommended - Use Dual protocol method (47+48). Download Dproto 0.4.1+Fix.exe, double click it and choose as installation folder, the main directory of your server (HLDS). Then go toHLDS\cstrike\addons\metamod, open plugins.ini and edit this line there:
win32 addons\dproto\dproto.dll
- 5.2 The old swds.dll No Stream patcher. Download it fron this link . Double click the exe and chose as installation folder, the main directory of your server (HLDS).
If you want a Stem Only dedicated server, just skip this step !
6. Next step is to configure te server.cfg in order to make your server work on the internet . Go toHLDS\cstrike folder and open server.cfg with Wordpad or Notepad. Deleeverithing and paste this:
// server name
hostname "BlackWolf Cs Server "
// rcon passsword
rcon_password "*************"
/ Server Configs
sv_airaccelerate 10
sv_accelerate 5
sv_aim 0
sv_airmove 0
sv_bounce 1
sv_cheats 0
sv_clienttrace 1
sv_clipmode 0
sv_contact "www.Doncsaddons.webs.com"
sv_friction 4
sv_gravity 800
sv_logblocks 0
sv_maxspeed 320
sv_proxies 1
sv_rcon_maxfailures 2
sv_restartround 0
sv_stepsize 18
sv_send_logos 1
sv_send_resources 1
sv_stopspeed 75
sv_unlag 1
sv_maxunlag .1
fps_max 600
sv_unlagpush 0.0
sv_unlagsamples 1
sv_uploadmax 0.5
sv_voiceenable 1
sv_voicequality 2
sv_wateraccelerate 10
sv_waterfriction 1
// server cvars
mp_friendlyfire 0
mp_footsteps 1
mp_autoteambalance 1
mp_autokick 0
mp_flashlight 1
mp_tkpunish 1
mp_forcecamera 0
sv_alltalk 1
sv_pausable 0
sv_cheats 0
sv_consistency 1
sv_allowupload 1
sv_allowdownload 1
sv_maxspeed 320
mp_limitteams 2
mp_hostagepenalty 5
mp_allowspectators 1
mp_timelimit 9000
mp_chattime 10
sv_timeout 4444
// round specific cvars
mp_freezetime 2
mp_roundtime 3
mp_startmoney 4500
mp_c4timer 40
mp_fraglimit 0
mp_maxrounds 0
mp_winlimit 0
mp_playerid 0
mp_spawnprotectiontime 5
// bandwidth rates/settings
sv_minrate 25000
sv_maxrate 0
decalfrequency 0.5
sv_maxupdaterate 25
sv_minupdaterate 0
sys_ticrate 1200
mm_insane 0
// server logging
log off
sv_logbans 0
sv_logecho 0
sv_logfile 0
sv_log_onefile 0
// operation
sv_lan 0
sv_region 0
// execute ban files
exec banned_user.cfg
exec banned_ip.cfg
setmaster enable "1"
setmaster add 69.28.151.162
setmaster add 69.28.151.162:27010
setmaster add 69.28.151.162:27011
setmaster add 72.165.61.189
setmaster add 72.165.61.189:27010
setmaster add 72.165.61.189:27011
setmaster add 207.173.177.11
setmaster add 207.173.177.11:27010
setmaster add 207.173.177.12
setmaster add 207.173.177.12:27010
setmaster add 68.142.72.250
setmaster add 68.142.72.250:27010
setmaster add 68.142.72.250:27011
setmaster add 65.73.232.251
setmaster add 65.73.232.251:27040
setmaster add 65.73.232.252
setmaster add 65.73.232.252:27040
setmaster add 65.73.232.253
setmaster add 65.73.232.253:27040
setmaster add hlmaster.jolt.co.uk
setmaster add 69.28.158.131:27010
setmaster add 209.197.20.34:27010
setmaster add 69.28.140.247:27010
setmaster add 69.28.140.245:27010
setmaster add 209.197.4.186:27010
setmaster add 69.28.151.162:27010
setmaster add 69.28.158.131
setmaster add 209.197.20.34
setmaster add 69.28.140.247
setmaster add 69.28.140.245
setmaster add 209.197.4.186
setmaster add 69.28.151.162
setmaster add 188.40.40.201:27010
setmaster add 209.197.20.34:27010
setmaster add 209.197.4.186:27010
setmaster add 68.142.72.250:27010
setmaster add 69.28.140.245:27010
setmaster add 69.28.140.247:27010
setmaster add 69.28.151.162:27010
setmaster add 69.28.158.131:27010
setmaster add 72.165.61.136:27010
setmaster add 72.165.61.189:27010
setmaster add 72.165.61.190:27010
setmaster add 95.65.64.90:27010
setmaster add 188.40.40.201
setmaster add 188.40.40.201:27011
setmaster add 72.165.61.136:27010
setmaster add 69.28.151.162:27010
setmaster add 69.28.151.162:27013
setmaster add 188.127.246.99:27000
setmaster add 72.165.61.136:27011
setmaster add 72.165.61.151:27013
setmaster add 72.165.61.151:27011
setmaster add 72.165.61.189:27011
setmaster add 72.165.61.151:27014
setmaster add 72.165.61.136:27015
setmaster add 72.165.61.151:27012
setmaster add 72.165.61.151:27015
setmaster add 72.165.61.136:27014
setmaster add 67.132.200.140:27012
setmaster add 88.40.40.201:27010
setmaster add 68.142.72.250
setmaster add 72.165.61.190
setmaster add 63.251.143.218
setmaster add 65.73.232.251:27040
setmaster add 65.73.232.253:27040
setmaster add ns1.antisteam.ru
setmaster add ns2.antisteam.ru
setmaster add ns4.antisteam.ru
setmaster add 65.73.232.251
setmaster add 65.73.232.253
setmaster add 83.99.253.152
setmaster add 213.239.209.221
setmaster add 188.134.26.232setmaster add 208.179.202.69
setmaster add 207.173.177.11
setmaster add 207.173.177.12
setmaster add 216.52.220.16
setmaster add 69.28.151.178
setmaster add ns1.zoneedit.com
setmaster add ns2.zoneedit.com
setmaster add ns3.zoneedit.com
setmaster add ns4.zoneedit.com
setmaster add ns5.zoneedit.com
setmaster add ns18.zoneedit.com
setmaster add ns19.zoneedit.com
setmaster add pr00f.oo.lv
setmaster add 72.165.61.185
setmaster add 72.165.61.186
setmaster add 72.165.61.187
setmaster add 72.165.61.188
setmaster add 69.28.156.250
setmaster add 88.142.64.164
setmaster add 68.142.64.165
setmaster add 69.28.145.170
setmaster add 69.28.145.171
setmaster add 69.28.145.172
setmaster add 208.111.158.52
setmaster add 208.111.158.53
setmaster add 208.111.171.82
setmaster add 208.111.171.83
setmaster add 68.142.91.34setmaster add 68.142.91.35
setmaster add 68.142.91.36
setmaster add 208.111.133.84
setmaster add 208.111.133.85
setmaster add 68.142.116.178
setmaster add 68.142.116.179
setmaster add 207.173.176.161:27010
setmaster add 78.60.235.56:27010
setmaster add 69.28.140.247:27010
setmaster add 69.28.140.246:27010
setmaster add 67.132.200.140:27010
setmaster add 72.165.61.189
setmaster add 68.142.64.164:27010
setmaster add 69.65.19.116:27010
setmaster add 72.165.61.151:27010
setmaster add 178.170.144.2:27010
setmaster add 216.207.205.98
setmaster add 216.207.205.99
setmaster add 85.26.177.168
amx_gamename "**-=P(F)S=-**"
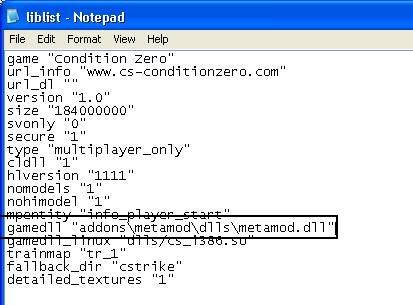
8. No go to HLDS\cstrike\liblist.gam , open it with Notepad or Wordpad and add this line:
| gamedll "addons\metamod\dlls\metamod.dll" |
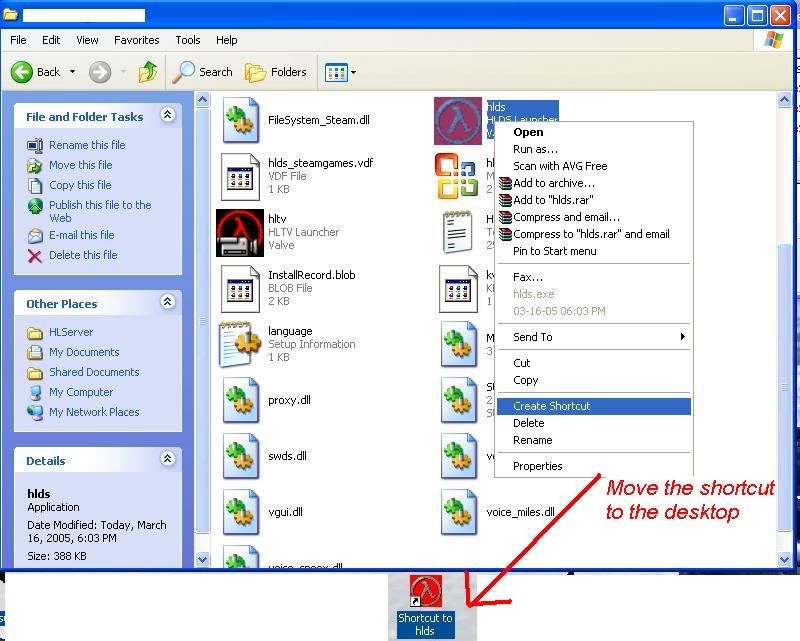
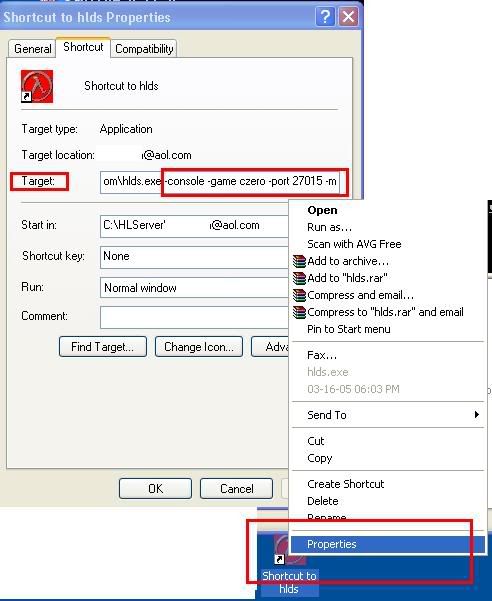
9. In order to turn the server on, create a shortcut of hlds.exe file on your desktop and double click it. Edit the Server Name and chose your map, port and RCON Password and click Start Server. Thehlds.exe file is located inside your main directory (HLDS).
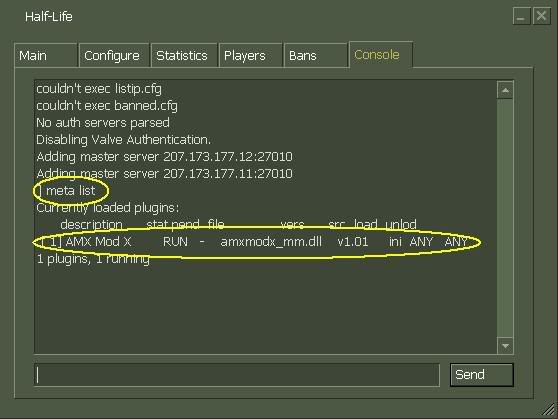
The installer automatically installed Amx Mod X 1.8.1 on your server. Amx Mod X helps you to administrate your server ( change maps, set up cvars, kick players) and shows the game statistics .
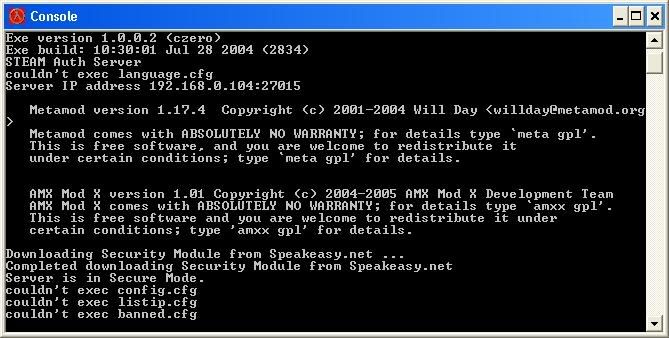
To see if it runs properly go to the server console and type meta list . If the message recived is:
AMX Mod X - RUN
..then everything it`s OK.
This is pritty much it. Have Fun !
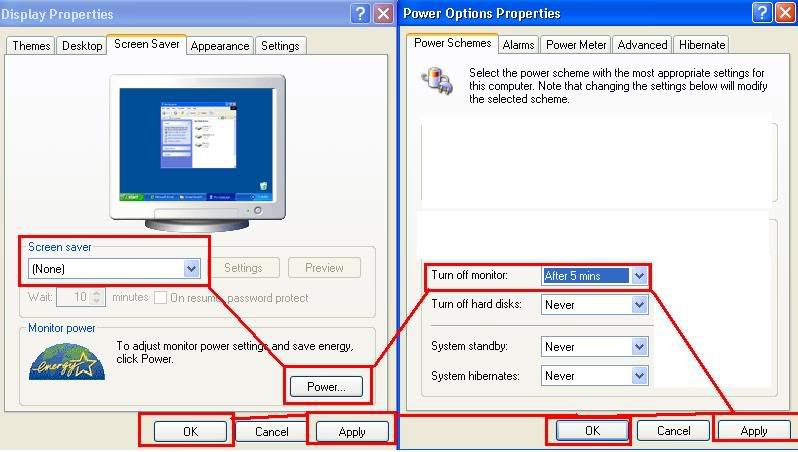
CS SERVER LAG SETTING And Server Setting
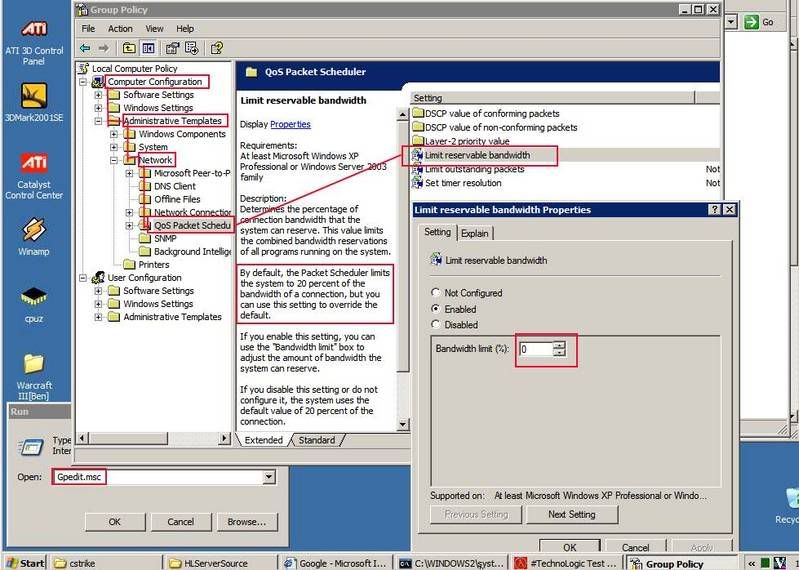
After installing Windows xp I noticed a slight increase in network latency in several online
games. It wasn’t a big deal – I’m talking 200-300ms, but this is on a connection that was reliably < 100ms in the past. Beyond the obvious settings in Windows or on your router, here’s a list of tweaks that may help quite a bit. It involves disabling Nagle’s algorithm, also commonly known as TCP no delay, which is basically an optimization of network traffic that tries to reduce overall packet volume but can cause extra latency in the connection. This should work on Windows 7 or Vista, though the same principle can probably applied to other operating systems as well.
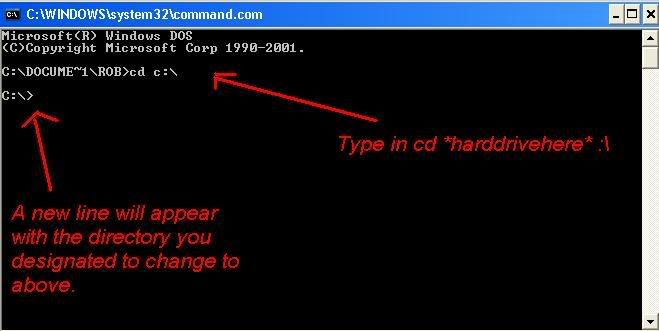
From a command prompt (usually in All Programs -> Accessories -> Command Prompt) run “regedit”Browse toHKEY_LOCAL_MACHINE\SYSTEM\CurrentControlSet\services\Tcpip\Parameters\Interfaces
Browse the items under interfaces until you find one that has an IPAddress entry matching the network interface you want to affect (typically LAN IP addresses start with 192.168 or 10.0); note that if your IP address is automatically assigned by a DHCP server you may need to look for a matching DhcpIPAddress instead of IPAddress
Right-click on the interface and select New > DWORD (32-bit) Value, name it “TcpAckFrequency”
Right-click the new TcpAckFrequency value and select Modify, enter 0“ 1 ? (Hexadecimal radio button should be selected)
Right-click on the interface and select New > DWORD (32-bit) Value, name it “TCPNoDelay”
(note that TCP is all uppercase this time – that’s intentional)
Right-click the new TCPNoDelay value and select Modify, enter 0 “ 1 ? (Hexadecimal radio button should be selected)
Verify that both TcpAckFrequency and TCPNoDelay now show up in the adapter’s property list with types REG_DWORD and values 0×00000001 Resatrt u r System Exitregedit and reboot (reboot is necessary for the changes to take effect!)
HKEY_LOCAL_MACHINE\software\microsoft\MSMQ\Parameters select New > DWORD (32-bit) Value, name it “TCPNoDelay” 0×00000001
This decreased my ping in most games from 200-300ms to 50-60ms, which matches the latency I would see via a tracert to the game’s server.
cs 1.6 bandwidth rates settings
This handy little chappy will calculate the recommended number of slots your HLDS or SRCDS server can run with rates, as recommended by Drek.
All calculations are directly from Drek's guidelines "setting rates for small home servers" (formerly "running a lag free server"), but since nobody can be bothered to read his highly useful and well structured advice, I have built this.
This script should work in IE/Opera/Firefox now. Thanks to pizzahut for help on getting it to work in Firefox.
Not got a clue what to enter? Here's some help.
 PaKorEE: Aho na Zro KhuBoo Lga K
|
__________________
Q6600 @ 3.6GHz:.:GA-P35-DS3L:.:4GB DDR2 RAM:.:BFG GTX 260:.:Ultra 120 eXtreme:.:Corsair 520HX X2 3600+ @ 3.1GHz:.:GA-MA78GPM-DS2H:.:1GB DDR2 RAM:.:eVGA 7900GS 256MB:.:Corsair 400CX HTPC: X4 620 0.9v:.:DFI LP JR 790GX:.:2GB DDR2 RAM:.:Asus HD4550 512MB:.:Corsair 450VX:.:32" Vizio 1080p HDTV Laptop: Sony Vaio CW27FX:.:Intel Core i5 @ 2.4GHz:.:GT 330M 512MB:.:4GB DDR3 RAM:.:14" LED AMD CPU List:.:How to HLDS:.:Heatware "The constant assertion of belief is an indication of fear."-Jiddu Krishnamurti
Last edited by ps2cho; 02-19-07 at 10:50 PM.
| |
 |  |

 03-17-05, 08:50 AM 03-17-05, 08:50 AM | #2 |

Member
Join Date: Oct 2004
Location: Socal, no hella here
|
__________________
Q6600 @ 3.6GHz:.:GA-P35-DS3L:.:4GB DDR2 RAM:.:BFG GTX 260:.:Ultra 120 eXtreme:.:Corsair 520HX X2 3600+ @ 3.1GHz:.:GA-MA78GPM-DS2H:.:1GB DDR2 RAM:.:eVGA 7900GS 256MB:.:Corsair 400CX HTPC: X4 620 0.9v:.:DFI LP JR 790GX:.:2GB DDR2 RAM:.:Asus HD4550 512MB:.:Corsair 450VX:.:32" Vizio 1080p HDTV Laptop: Sony Vaio CW27FX:.:Intel Core i5 @ 2.4GHz:.:GT 330M 512MB:.:4GB DDR3 RAM:.:14" LED AMD CPU List:.:How to HLDS:.:Heatware "The constant assertion of belief is an indication of fear."-Jiddu Krishnamurti
Last edited by ps2cho; 03-20-05 at 08:28 PM.
|
| | |
 Easy.
Easy.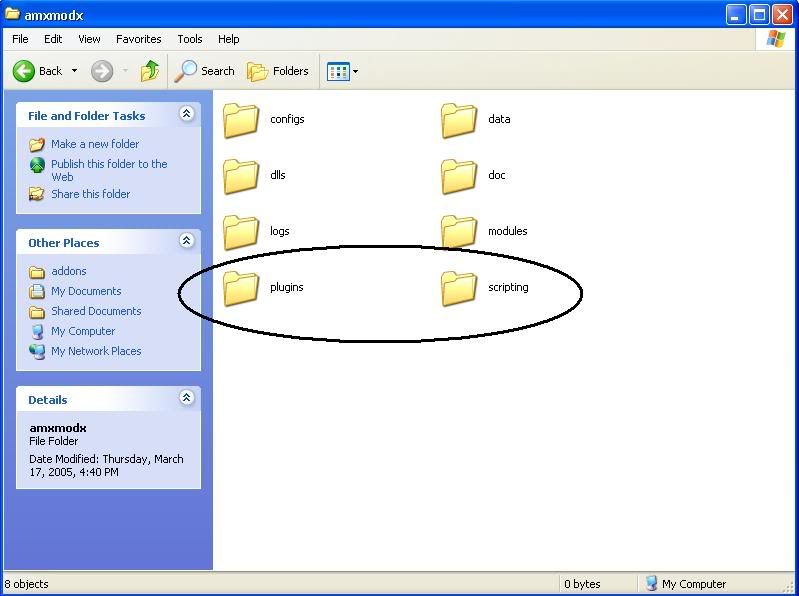


| 03-17-05, 08:51 AM | #3 |
|
Member
Join Date: Oct 2004
Location: Socal, no hella here
|
__________________
Q6600 @ 3.6GHz:.:GA-P35-DS3L:.:4GB DDR2 RAM:.:BFG GTX 260:.:Ultra 120 eXtreme:.:Corsair 520HX X2 3600+ @ 3.1GHz:.:GA-MA78GPM-DS2H:.:1GB DDR2 RAM:.:eVGA 7900GS 256MB:.:Corsair 400CX HTPC: X4 620 0.9v:.:DFI LP JR 790GX:.:2GB DDR2 RAM:.:Asus HD4550 512MB:.:Corsair 450VX:.:32" Vizio 1080p HDTV Laptop: Sony Vaio CW27FX:.:Intel Core i5 @ 2.4GHz:.:GT 330M 512MB:.:4GB DDR3 RAM:.:14" LED AMD CPU List:.:How to HLDS:.:Heatware "The constant assertion of belief is an indication of fear."-Jiddu Krishnamurti
Last edited by ps2cho; 02-19-07 at 05:01 PM.
|
| | |
| 03-17-05, 08:52 AM | #4 |
|
Member
Join Date: Oct 2004
Location: Socal, no hella here
|

 So I will spend a little more time and add all the images again so you can see exactly how to do it.


0 comments:
Post a Comment